Breaking down a whole duck into portion size pieces is easier than you think. Here's our step by step guide to walk you through it.
Duck larb recipe
Pork, duck and fig terrine recipe
Mandarin pancakes for Peking duck recipe

Being faced with a whole duck can be rather daunting the first time. I know I was. Where to start is the big question.
I'm just like most people, if I need duck breast for a recipe, then I go buy duck breast, not a whole duck. At a recent duck masterclass with Adam D'Sylva I had a refresher course on breaking down a whole duck.

This made me think about my nose to tail cooking ethics. By buying a whole duck, I do make sure I make good use of the whole duck. Not that there really is that much to a whole duck to start with.
In a lot of ways breaking down a whole duck is pretty easy. There really isn't much to a duck beside the legs and breasts. These are the two prime cuts of a duck.

Orientate yourself and position your duck. The neck is at the top and the parson's nose (pygostyle) is at the bottom. You can tell the back to the front as you will feel the meaty breasts which are the front, the bony side is the back.
You will want your duck to be breast side up to break it down.
Essential Equipment
Cutting Board: To break down a whole duck you will need a solid cutting board which will not slip. Place chux/kitchen wipes or a tea towel under your board to stop it slipping.
Knife: You will need a sharp knife. I use my 20 cm/8 inch chef's knife, as it is my go to knife for everything. I love the weight and grip. You may prefer to use a smaller knife, which is totally acceptable. Just make sure it is sharp.
 Removing the neck and wing tips
To ease you into breaking down a whole duck let's start with a couple of easy cuts.
If your duck still has its neck attached it will need to be removed. Cut the skin around the base of the neck where it meets the "shoulders" top of the main body of the duck. Break the neck where you have cut the skin and cut through the break with your knife to remove the neck.
To remove the wing tips, cut through the skin at the joint of the wing and wing tips. Then snap wing tips off from the rest of the wing.
At this point you can remove the wishbone. Some people remove it, some people don't, it is your choice. Removal of the wishbone can make the later removal of the breast section easier. To remove the wishbone run you finger under the skin where you have removed the duck neck.
Once you have located the wishbone, using the tip of your knife cut the flesh around it without breaking the skin. Then using your fingers to pull it out from the bird.
 Removing the legs
Cut through the skin between the leg and the body of the duck. Pull the leg away from the body and you will see the leg joint. Continue cutting around and under the joint. With both hands dislocate the duck leg from the body of the duck. You will hear and distinct crack. Then using your knife cut through the rest of the joint to detach the leg. Repeat with the other duck leg.
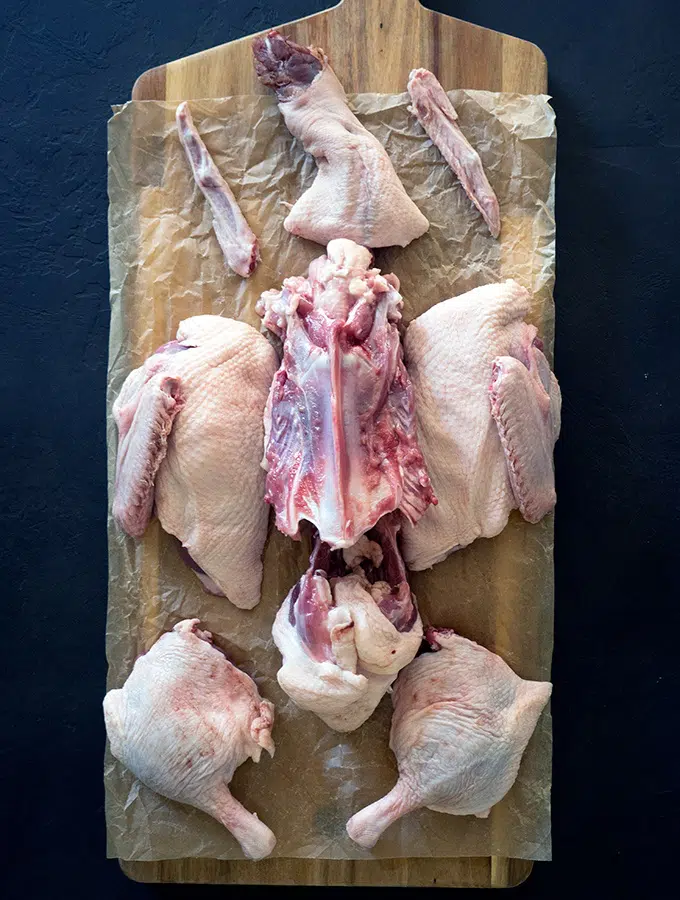 Removing the breasts
The breastbone of the duck runs down the centre of the bird, feel for it with your fingers. Using your knife make an incision from the top of the breastbone down to the bottom.
Work with one breast at a time. Cut as close to the bone as possible along the edge of the breastbone, a few centimetres deep. Then using your fingers gently run your fingers between the duck breast and the breastbone, working your way down the breast away from the ribcage to remove the breast. If you need to use your knife to help remove the breast do so. You want the ribcage to be clean of meat when you are done.
Once you have peeled the breast away from the rib cage use your knife to cut through the skin to remove the breast from the main body of the duck.
Remove the tenderloin from the breast.
 Removing wings from the breasts
Some people may like to keep the wings on the duck breast if baking or you may wish to remove them.
Removal is quite easy, run your knife around where the wing joins the breast. Then firmly in two hands at the joint, dislocate the wing from the breast. Use your knife to cut through the joint to separate.
 What to do with the duck carcass?
Make stock of course! If your duck was fresh (not previously frozen) the carcass can be frozen to make stock another day.
If you are breaking down a whole duck for a particular recipe, then they may get you to use the wings and wing tips in sauce preparation. Or the carcass for some other part of the recipe.
The main point is, don't waste a thing. Don't just throw that duck carcass in the bin. Have a plan and make good use of it.
Personally, I freeze mine until I have a couple. Then I make stock.
Sara xxx
Become a subscriber and don't miss a single delicious recipe, restaurant review or travel adventure.
Leave a Reply