Warm loaves of home-baked Turkish bread, or Turkish pide, straight from the oven will fill your home with a sensational aroma. This recipe makes two loaves, or the dough can be divided into more pieces to make Turkish bread rolls.

Turkish bread is a staple on supermarket shelves across Australia. Sold as either loaves or rolls, it's tasty and versatile to have on hand. Used for sandwiches or sliced to be scooped through delicious dips such as toum (garlic dip), or dunked into olive oil.
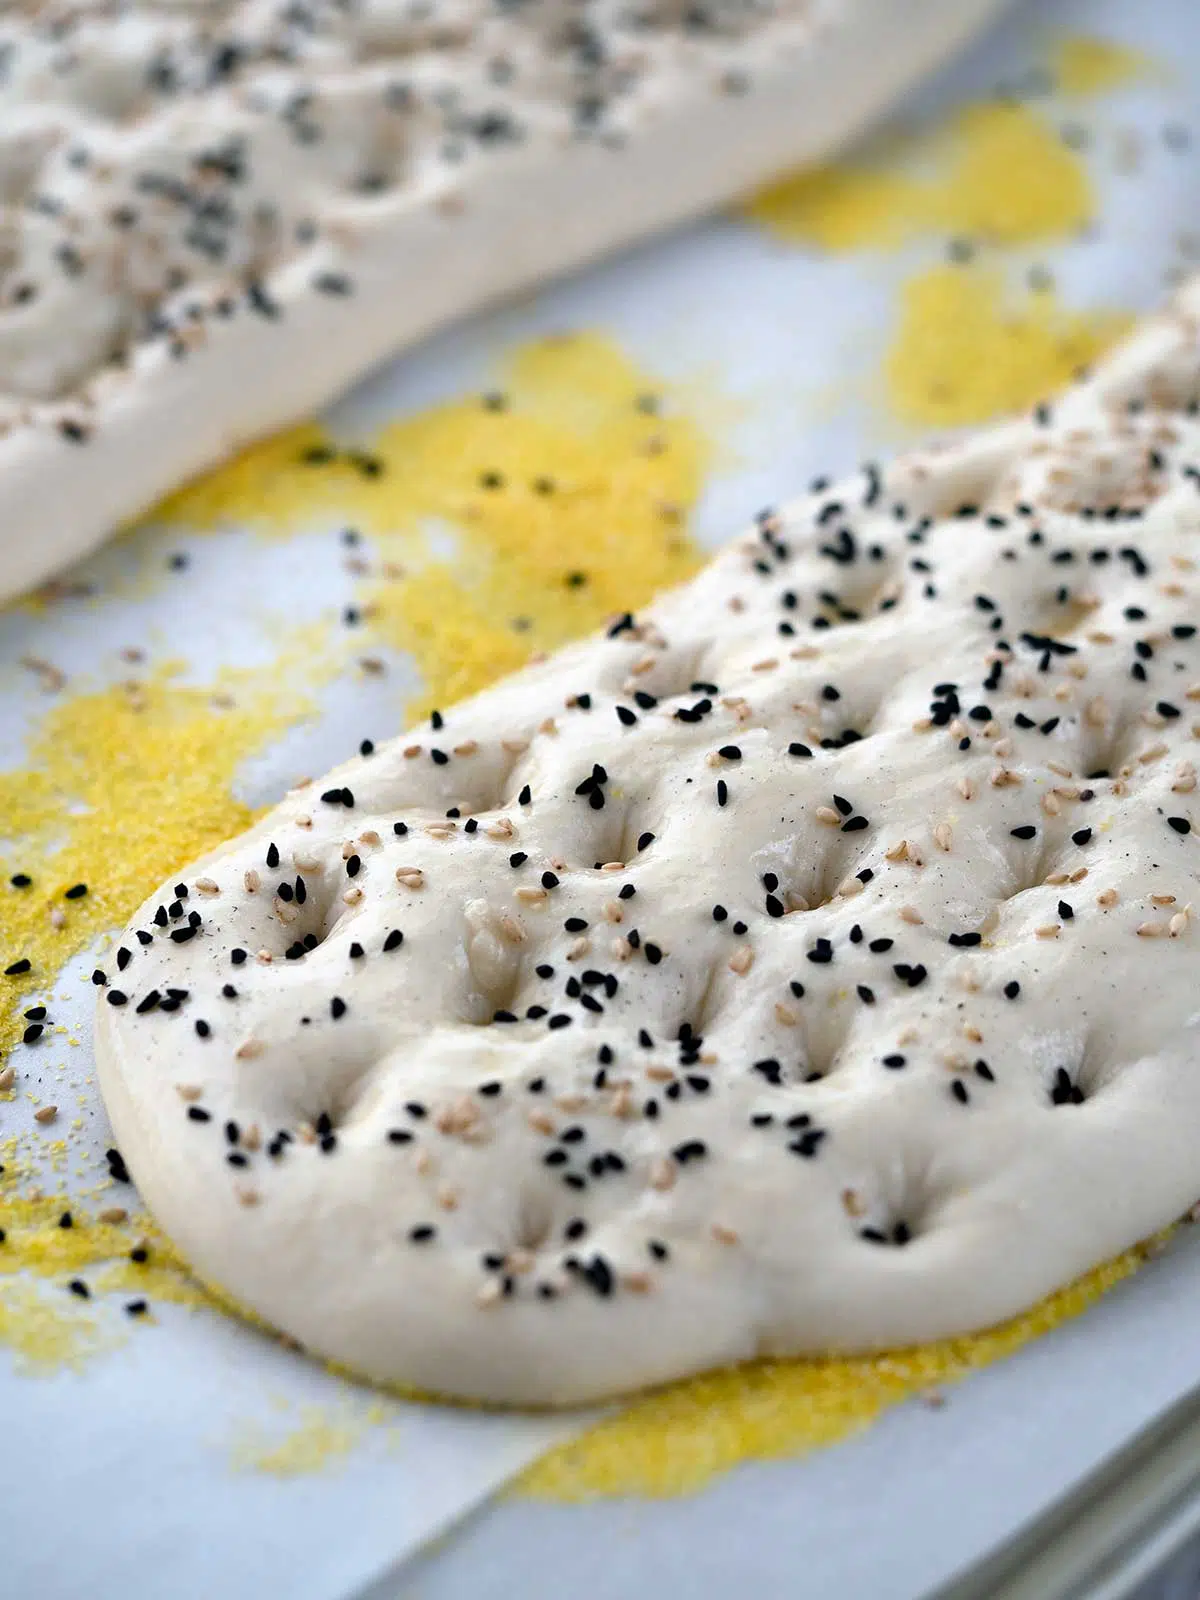
Until I started baking it at home I hadn't thought much about the distinctive smell Turkish bread has. If you know the bread you know the subtle smell. It's from the nigella seeds scattered over the top of the loaves along with sesame seeds. They roast and produce a rich aroma during baking.
Like most home-baked bread it is best eaten within a day or two. I transform any leftover bread, after a couple of days, into "pizza". Simply slice in half, add your desired toppings, and bake in the oven for 10 minutes or so.
Sara xxx
What's in this post
Ingredients
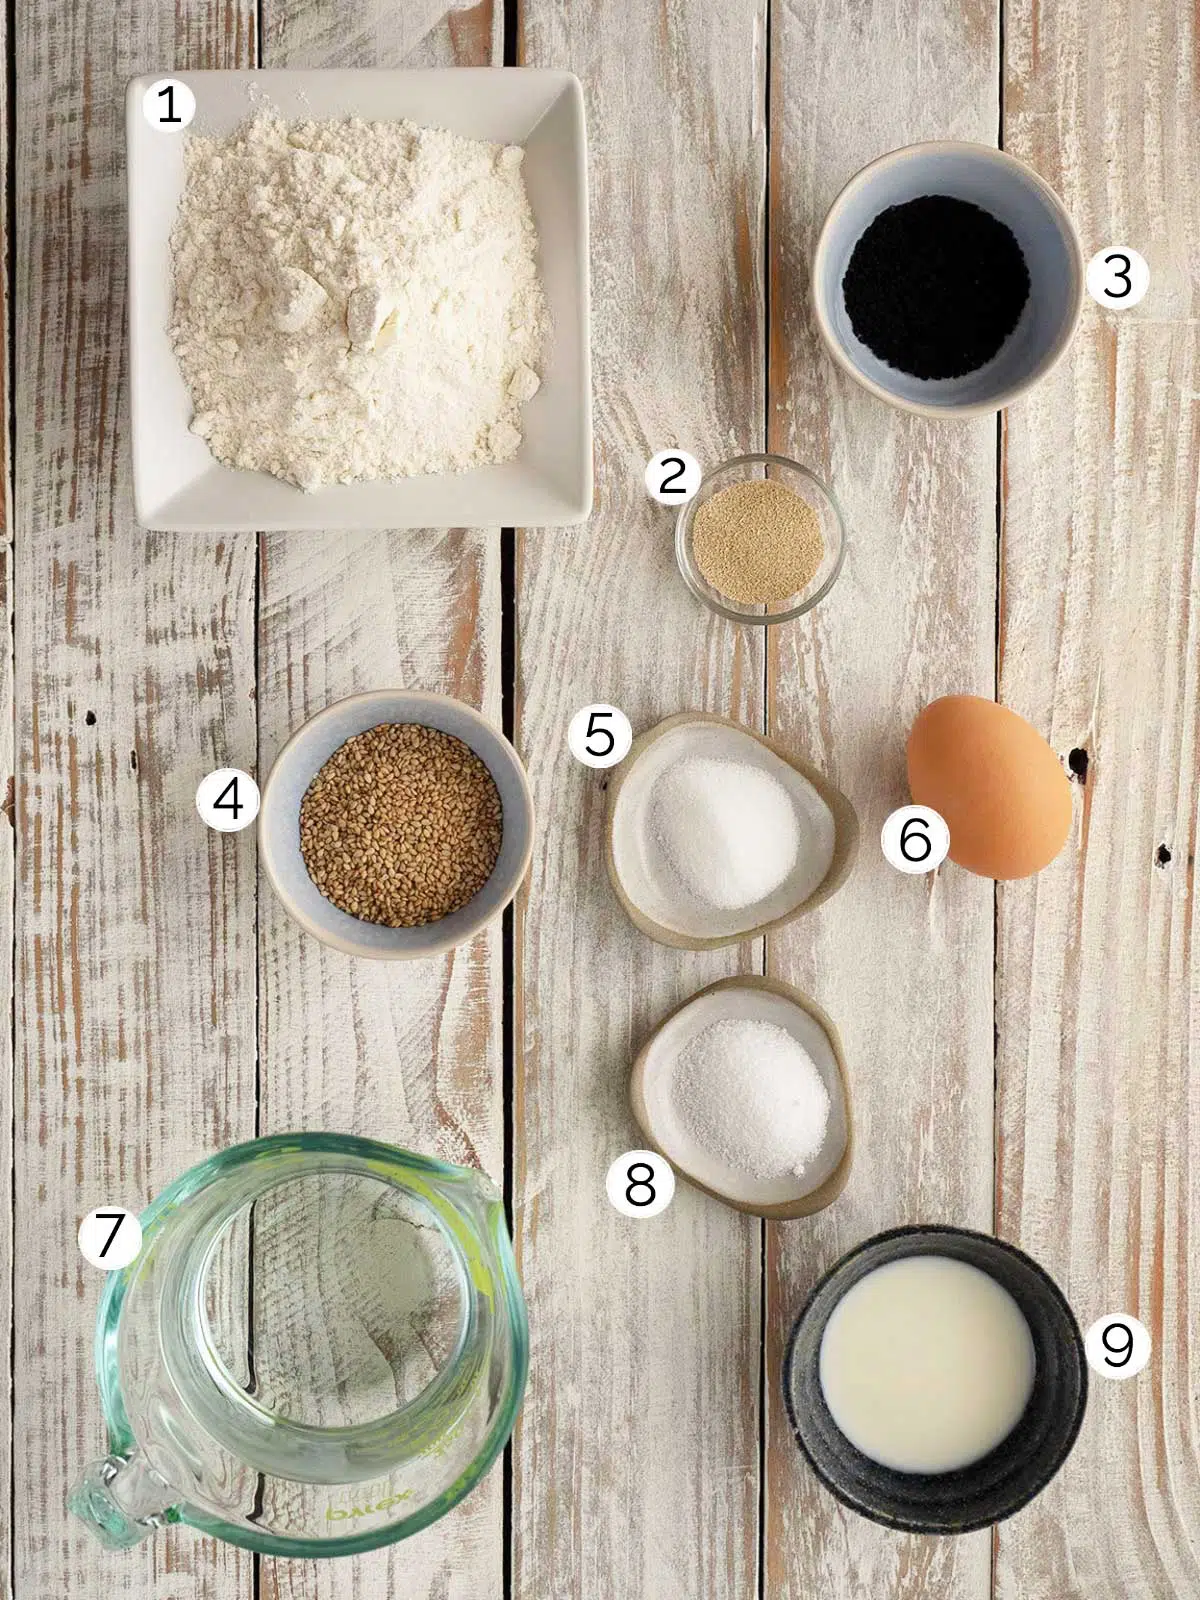
- Flour: For simplicity of the recipe you can use all-purpose flour (plain flour). If you do happen to have bread flour (00 flour) on hand use it.
- Yeast: Even though Turkish bread is rather flat looking it does include yeast as a raising agent in the recipe. I use instant yeast granules.
- Nigella Seeds: Nigella seeds (Nigella Sativa) are a black seed that have a very distinct smell and taste. They are also known as charnushka, black caraway seed, black cumin, or kalonji. They give the bread its distinct aroma and can't adequately be substituted. If you can't find them omit them and use a combination of black and white sesame seeds.
- Sesame Seeds: Along with the nigella seeds they top the bread for texture, flavour and aroma.
- Salt: Use everyday cooking salt, or Kosher.
- Egg: Is used to make an egg wash with some milk. Helps the seeds stick to the top of the loaves and aids browning the bread during baking.
- Water: If your tap water is drinkable then tap water is fine.
- Sugar: Helps activate the yeast.
- Milk: Use whatever milk you have in the fridge.

Make it a complete meal
Served straight from the oven homemade Turkish bread is a delicious centrepiece to a Mediterranean/Middle Eastern fusion feast. Pull together a selection of store bought and homemade goodies for a special meal.
- Dips: A selection such as toum, baba ganoush, hommous, or smoked salmon dip.
- Salad: Crisp green sald, fatoush, or tabouli.
- Cheese: A hearty slab of feta or some grilled haloumi.
- Favourites: Add a few favourirtes such as falafel, kibbeh, koftas, garlic prawns, or bbq octopus.
- A Little Something More: Olives, stuffed vine leaves, smoked tomatoes, pickled peppers or turnip.
Recipe Instructions
Scroll to the bottom of the page for a printable version of this recipe.
You can use a stand mixer with a dough hook for this recipe instead of muscle power.
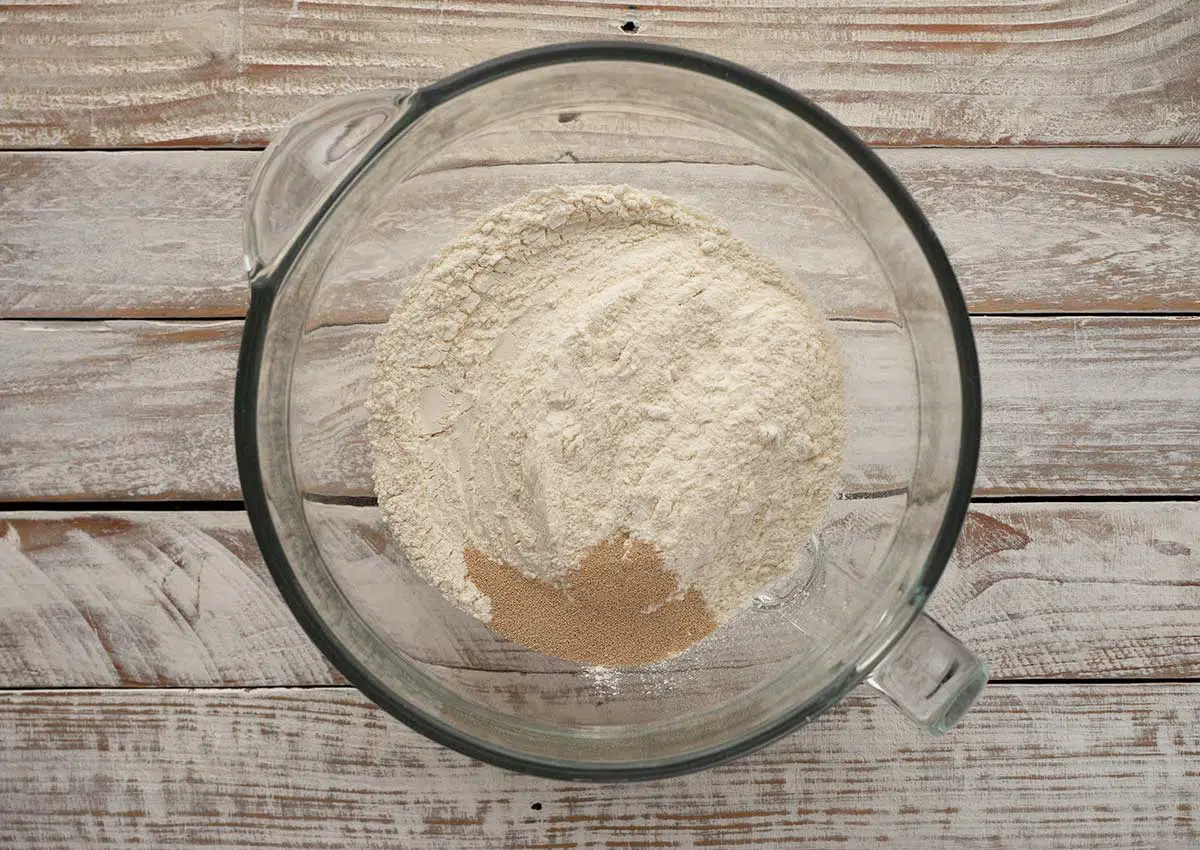
Place flour, yeast, sugar, and salt in a large bowl (or stand mixer bowl). Mix ingredients together.
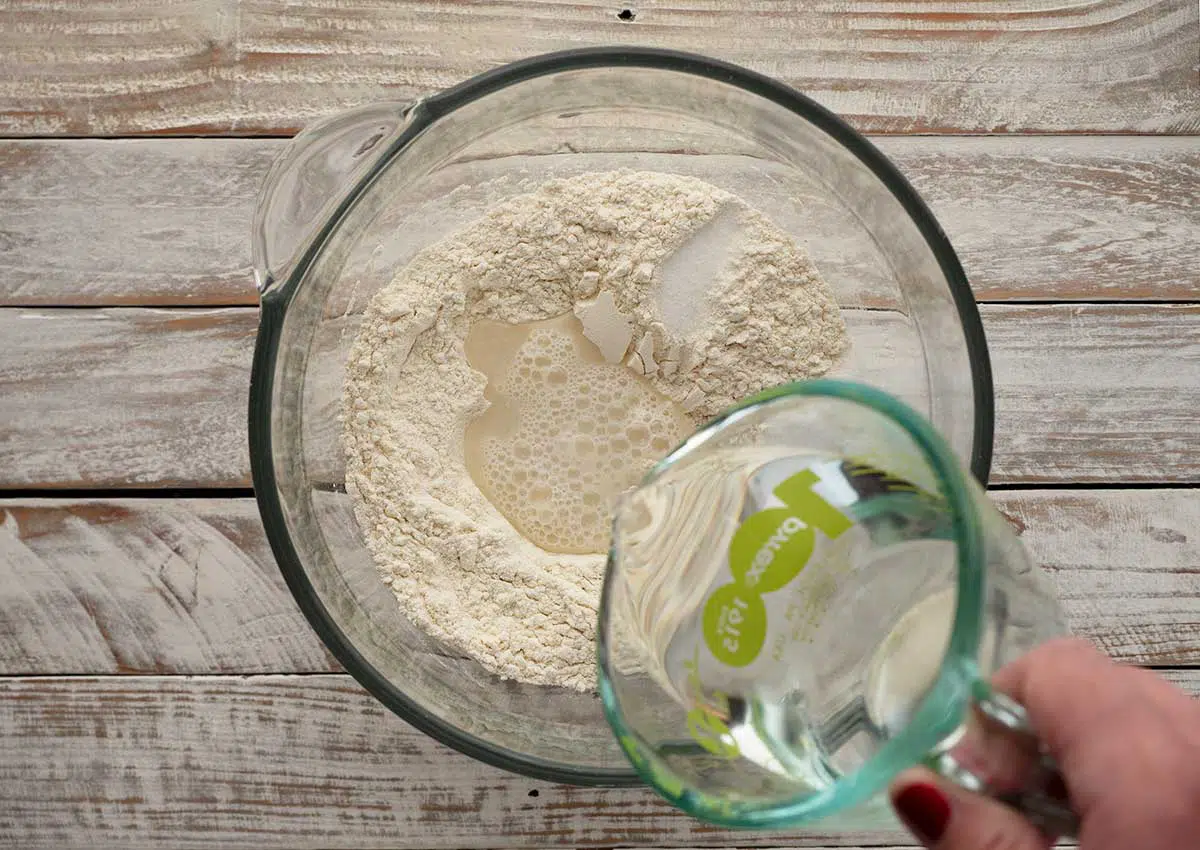
Make a well in the middle of the flour mixture. Pour in water.
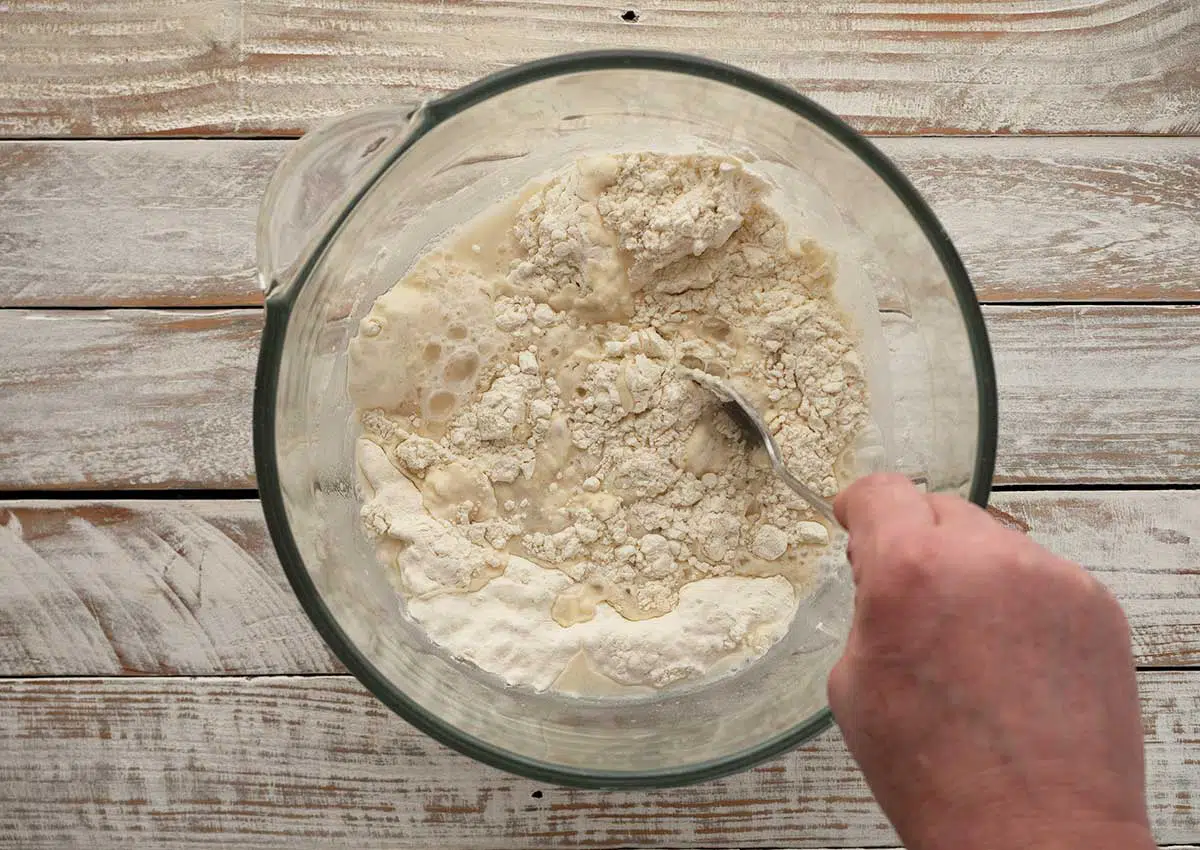
Using a spoon and then hands until the dough comes together.
If using a stand mixer use the dough hook and knead for 10-12 minutes.
If kneading by hand place mixture on a floured surface and knead for 15 minutes.
The dough will be sticky, elastic, and have a shine to it.
Place dough in a clean lightly greased bowl and cover with plastic wrap. Leave in a warm area of the kitchen to rise for an hour or until the dough has doubled in size.
Read about proofing dough in a dehydrator below.

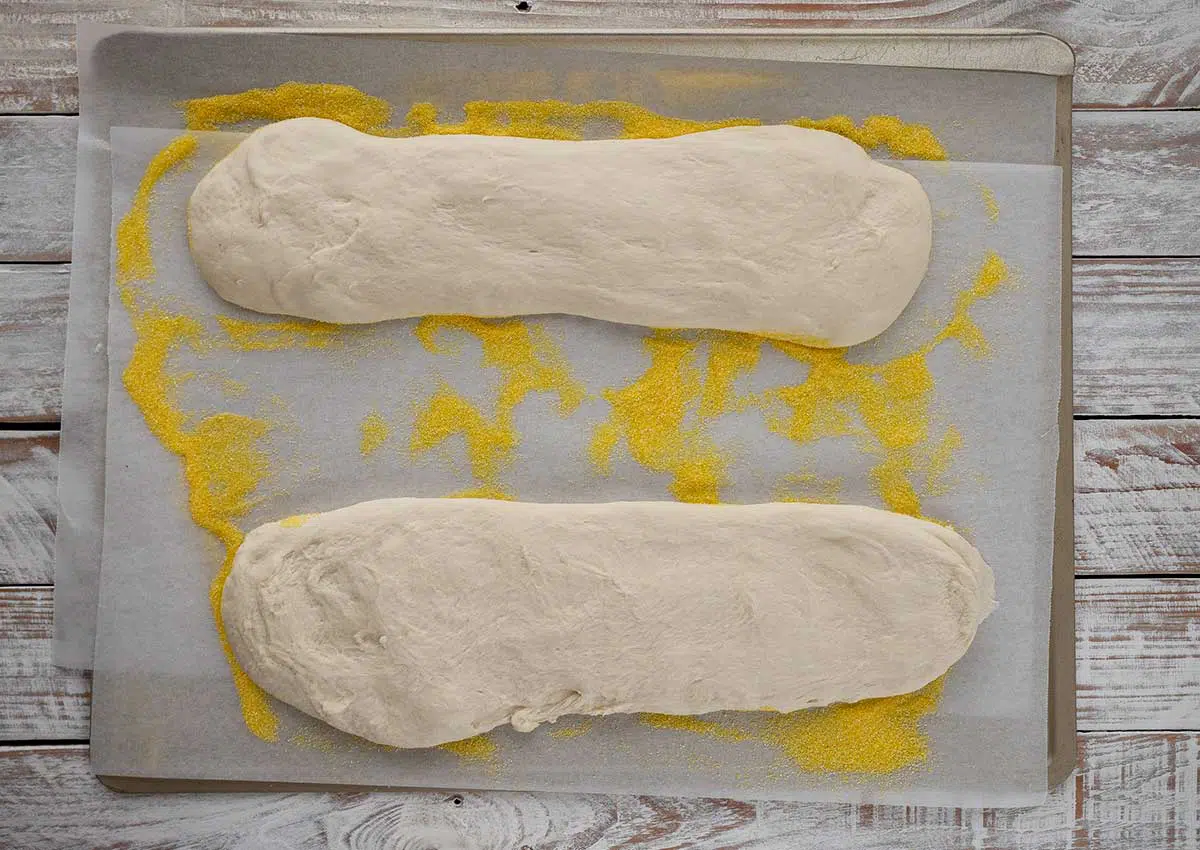
Once the dough has doubled in size, shape and stretch the dough into two long flat loaves. You can also shape the dough into six large or eight small shapes to make Turkish rolls. As the dough is sticky make sure to flour your hands.
Place on a baking tray lined with baking paper and scattered with fine polenta. Cover with a damp cloth or damp clean tea towel and leave to rest for 15 minutes.

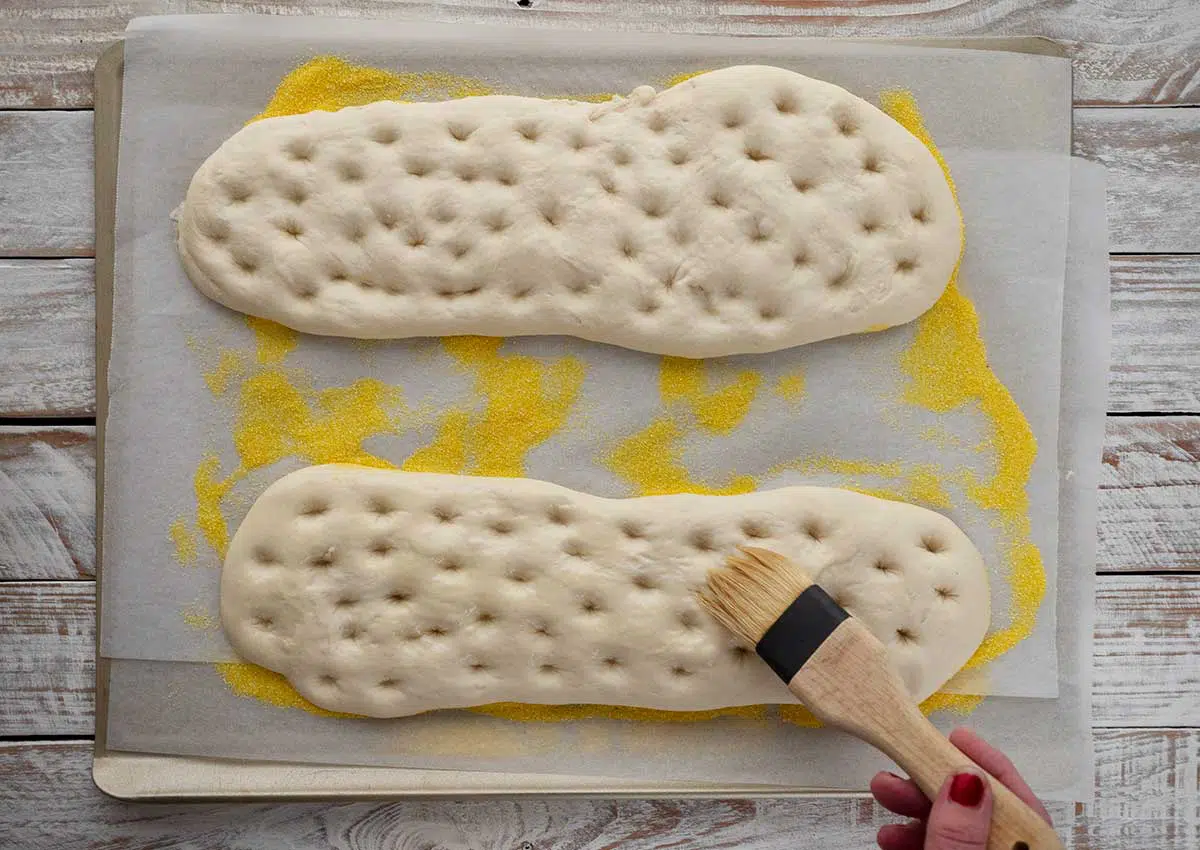
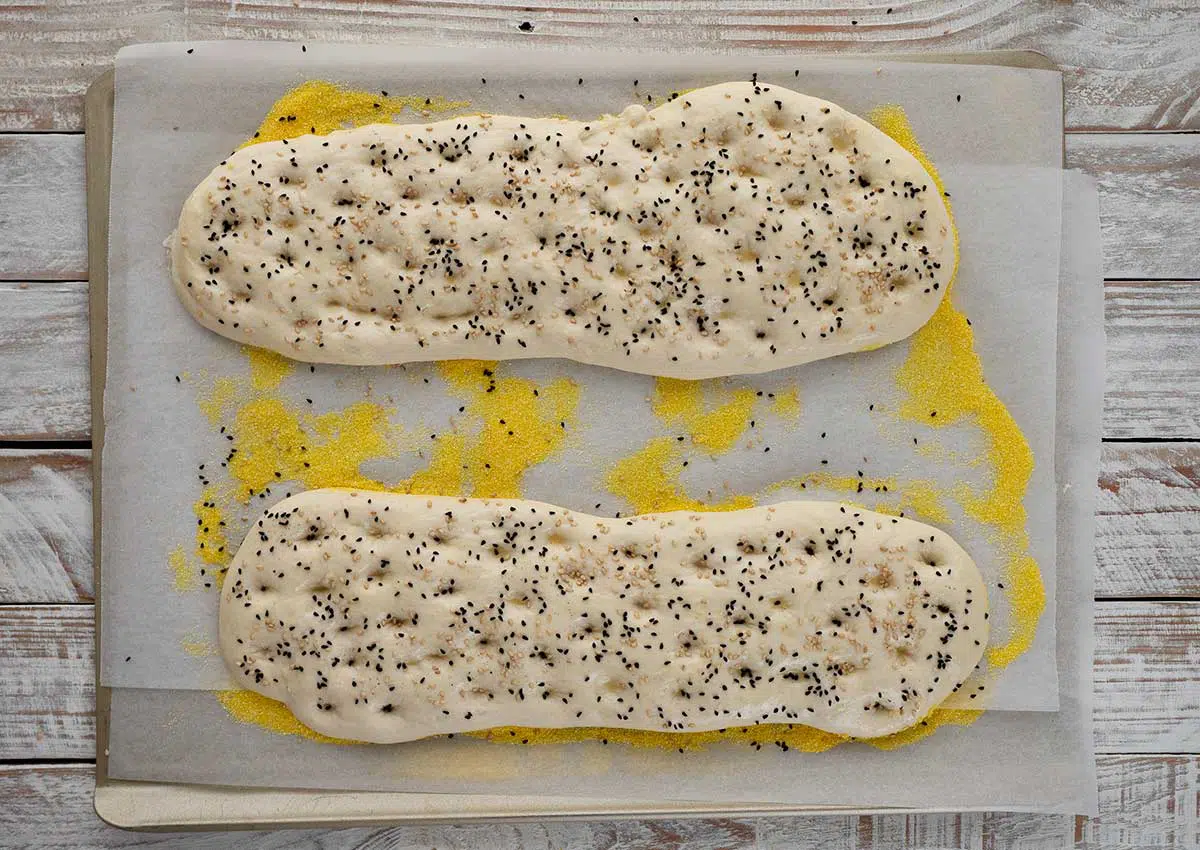
Once the loaves have rested for 15 minutes using either your finger or end of a wooden spoon (dusted with flour) poke dimples over the surface of the loaves. Brush the tops of the loaves with eggwash and then sprinkle with nigella and sesame seeds.
Bake the loaves in a 230°C/450°F pre-heated oven for 15 minutes or until golden brown and cooked through.

Proofing dough in the dehydrator
If you have a dehydrator using it to proof dough makes life so much simplier, especially during winter. Dough will rise quicker and more predictably due to a constant temperature.

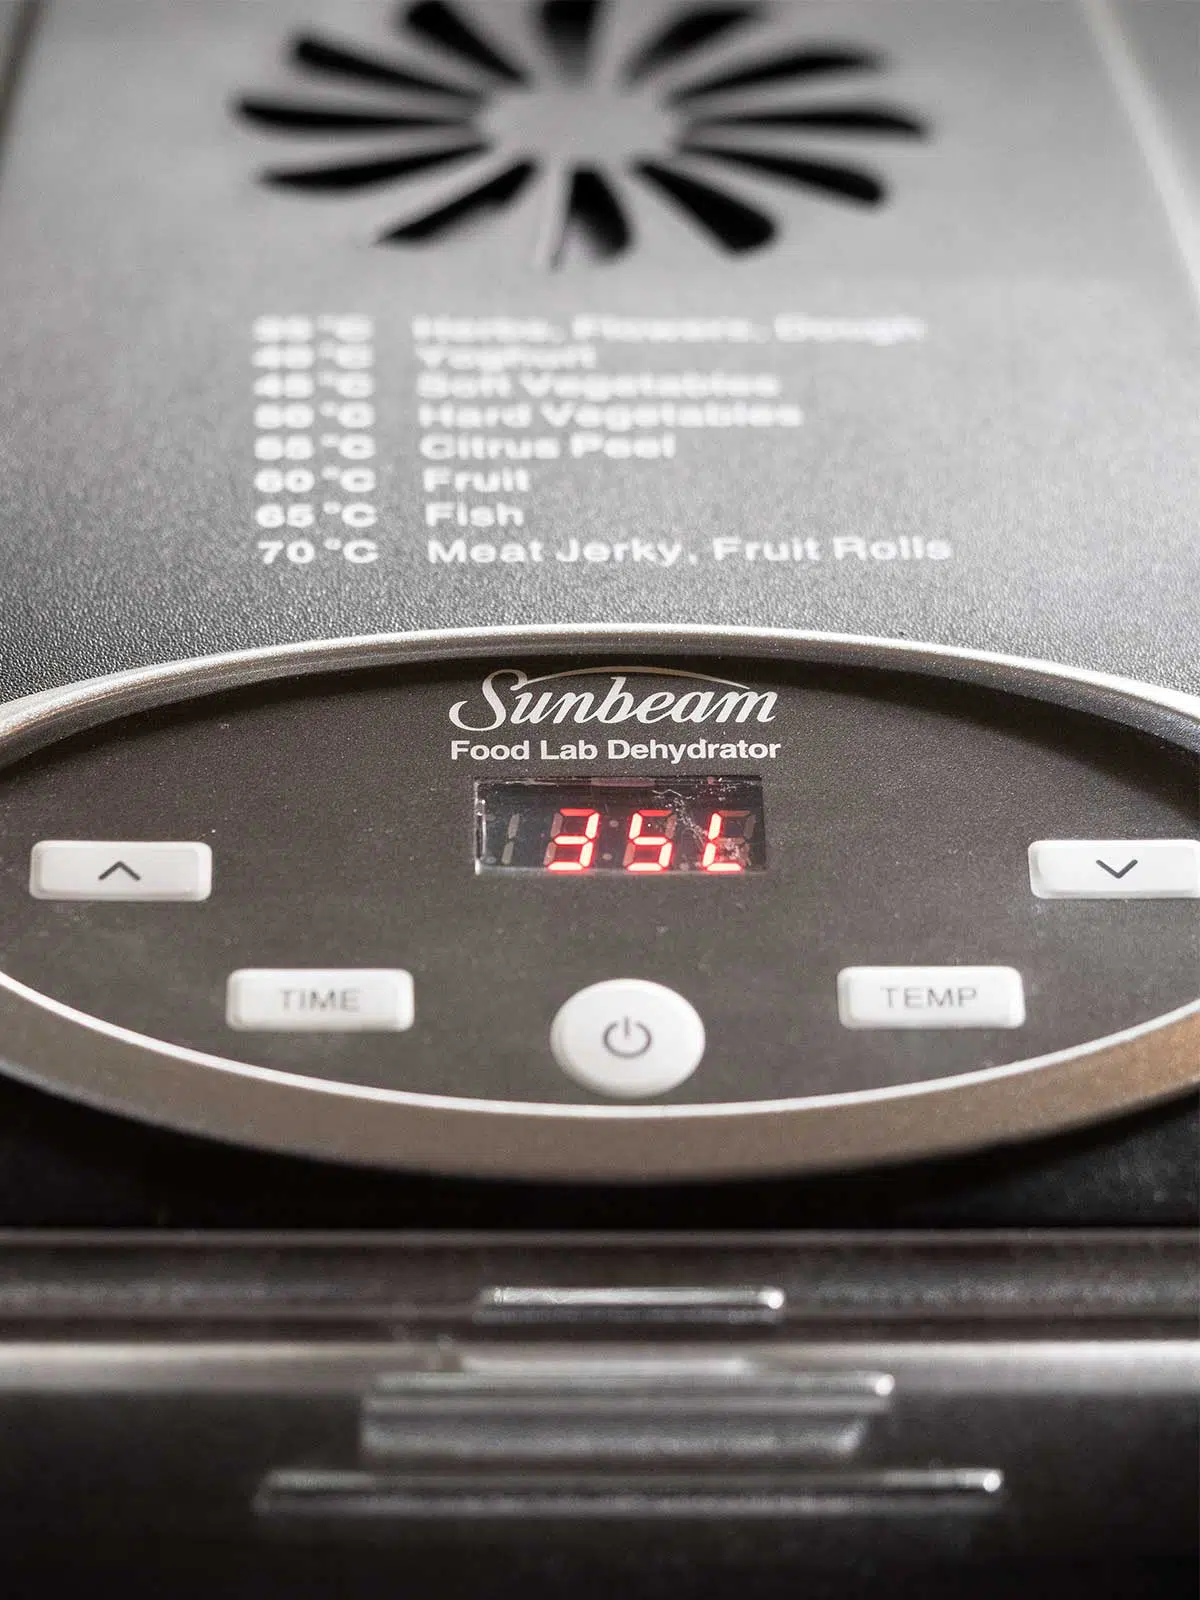
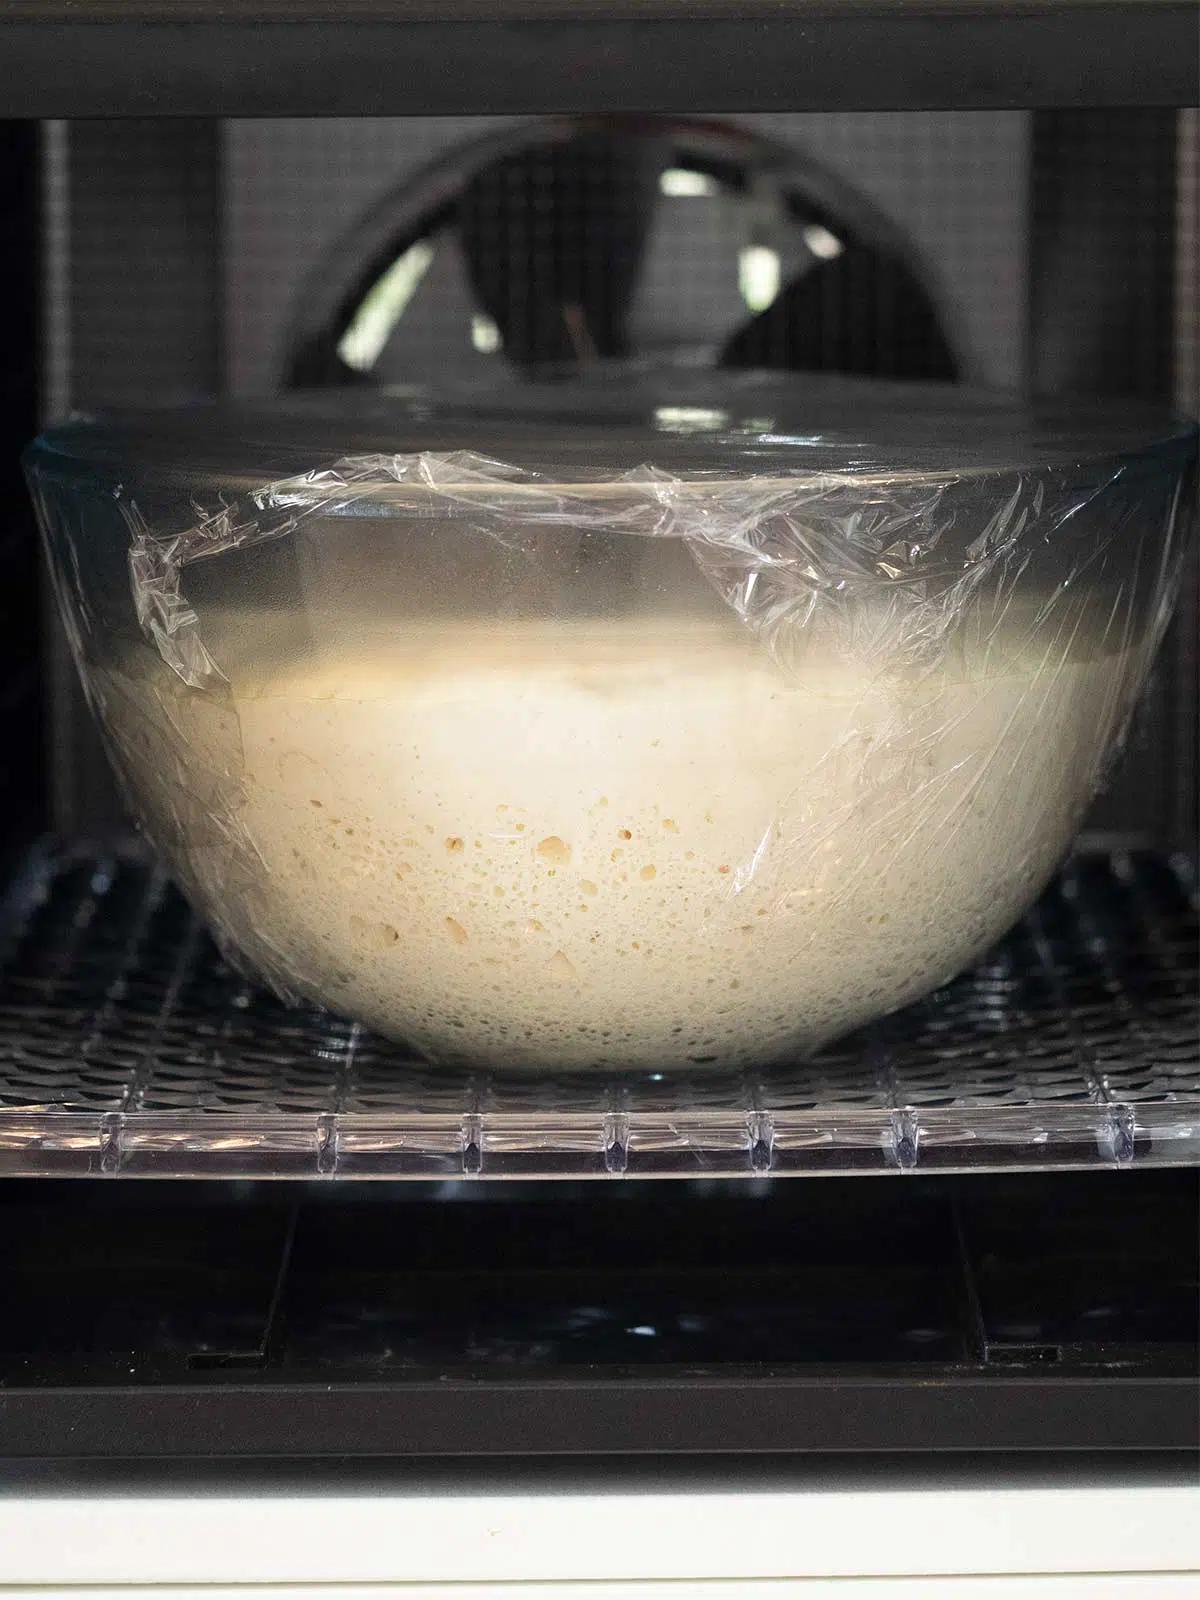
Set the dehydrator temperature to 35°C/95°F and place your covered bowl of dough on one of the shelves. Close the dehydrator door and allow it to work it's magic until the dough has doubled in size.
Obviously if you are in the midst of an Aussie summer, leave the dehydrator packed away.

Printable Recipe

Turkish Bread
Ingredients
- 500 grams bread flour
- 1 teaspoon dried yeast
- 1 teaspoon caster sugar (superfine sugar)
- 2 teaspoons salt
- 315 mls (1 ¼ cups) water
- 2 teaspoons sesame seeds
- 2 teaspoons nigella seeds
- 2 tablespoons fine polenta (optional) | can be sprinkled over baking sheet before baking the Turkish bread
Egg Wash
- 1 egg
- 1 tablespoon milk
Instructions
- You can use a stand mixer with a dough hook for this recipe.Place flour, yeast, sugar, and salt in a large bowl (or stand mixer bowl). Mix ingredients together.
- Make a well in the middle of the flour mixture. Pour in water.
- Using a spoon and then hands mix ingredients until the dough comes together.
Kneading with a Stand Mixer
- Once you have brought the dough together by hand place bowl in the stand mixer. With the dough hook attached knead dough for 10-12 minutes.The dough will be sticky, smooth, elastic, and have a shine to it.
Kneading by Hand
- Once you have brought the dough together by hand turn the dough from the bowl onto a lightly floured surface. Lightly flour hands and knead dough for 15 minutes.The dough will be sticky, smooth, elastic, and have a shine to it.
Proofing the Dough
- Place dough in a clean lightly greased bowl and cover with plastic wrap. Leave in a warm area of the kitchen to rise for an hour or until the dough has doubled in size.
- Once the dough has doubled in size turn dough onto a lightly floured surface.Cut the dough in half (or into six or eight even pieces for Turkish rolls).
- With lightly floured hands shape and stretch the dough into two long flat loaves. Or shape the dough into six large or eight small shapes to make Turkish rolls.As the dough is sticky make sure to flour your hands.
- Place on a baking tray lined with baking paper and scattered with fine polenta. Cover with a damp cloth or damp clean tea towel and leave to rest for 15 minutes.
Baking Turkish Bread
- Once the loaves have rested for 15 minutes using either your finger or end of a wooden spoon poke dimples over the surface of the loaves.
- Pre-heat oven 230°C/450°F
- Brush the tops of the loaves with egg wash and then sprinkle with nigella and sesame seeds.
- Bake the loaves in the oven for 15 minutes or until golden brown and cooked through.
Egg Wash
- Place egg and milk in a small bowl and whisk.
Oven Temperatures
All oven temperatures are fan forced.
Measurement Notes
All measurements are Australian metric standard. All measures are level, and cups are lightly packed unless specified. 1 teaspoon = 5ml / 1 tablespoon = 20mls / 1 cup = 250ml /4 teaspoons = 1 tablespoon.
Recipe Notes
- 1 teaspoon equals 5ml
- 1 tablespoon equals 20 ml (Nth America, NZ & UK use 15ml tablespoons)
- 1 cup equals 250ml (Nth America use 237ml)
- 4 teaspoons equal 1 tablespoon
- I use the below unless specified in my recipes.
NUTRITIONAL INFORMATION
The recipe's nutritional information is an approximation based on an online calculator. It is meant solely for reference purposes. If you're looking for precise details, be sure to double-check with your own research.
Gaye
I have just discovered this recipe and am very keen to try it. I would like to make it as rolls as well as the loaves. Could you tell me what, if any adjustments in baking temperature and timing I would need to make for the rolls as opposed to the loaves? Thank you.
Sara McCleary
Hi Gaye
It is hard to give an exact answer on baking time if making rolls. If they are the same thickness and width as a loaf (just not as long), then the baking time will be relatively the same.
If making the rolls rounder and thicker, then baking time may increase.
Temperature, keep it as the recipe above.
Cheers, Sara
Brenda
Hi. I made this and it was heavy. Please help me with what I did wrong. Loved it
Sara McCleary
Hi Brenda
Unfortunately, it is hard for me to know what went wrong. Maybe overworked the dough? The dough didn't prove enough? I wish I could be more help.
Cheers, Sara
Annick
Super quick to make and kept well for a couple of days. It's a great quick bread. Thank you for sharing the recipe.
Sara McCleary
Hi Annick
Glad you liked the recipe. It is a great quick bread.
Cheers, Sara
Marnie
Just made this today and it worked out so well! Amazing recipe and will be making this regularly! I made with whole grain flour as well! Thank you!
Sara McCleary
Hi Marnie
I love the idea of making it with whole grain flour. I am going to have to give it a try.
Cheers, Sara
Sonia
love this recipe! I wasdubious after my first proof and then after the resting stage I wasnt sure, but the magic happens in the cooking!! it works amazingly well..
Sara McCleary
Hi Sonia
Sorry to make you have your doubts during the making process. I hope you weren't cursing me under your breath (or loudly in your kitchen). Thrilled to hear that it all turned out in the end and that you are happy.
Cheers, Sara
Terry Southcott
Hi, your recipe doesn't seem to list exactly how much salt to add, cheers
Sara McCleary
Hi Terry
Thank you for bringing that to my attention. The missing measurement for salt has now been added to the recipe. Not sure what happened there and my apologies.
Cheers Sara