Cheeselova (lova), hmmm, Cheeselova (lova), hmmm.
They say sharing is caring, so here is a little snippet of how my often whacky brain works. My inner Weird Al Yankovic is regularly allowed to run free, resulting in some interesting lyrics to popular artists' songs. Neither my Cheeselova nor Shaggy's Mr Bombastic were safe. The word Cheeselova fitted perfectly to the start of the song.
Come on….. You know you want to….. Sing with me……
Cheeselova (lova), hmmm, Cheeselova (lova), hmmm.
Cheeselova (lova), hmmm, cheeselova (lova)….
Cheesecake and pavlova antics
It's deliciously fantastic
Serve it up at Christmas and watch the peeps go woooah
Now close your eyes and imagine me dancing around the kitchen with Cheeselova in hand, a delicious cheesecake pavlova hybrid, singing Cheeselova (lova) to Shaggy's Mr Bombastic.
Or maybe, for your mental health, skip that particular visual …..
To say I am excited about this dessert is an understatement. I knew it was going to be good, I just didn't realise how good.

Cheesecake and Pavlova would probably be two of the most popular desserts that Aussies entertain with. Along with trifle, I would hazard a guess that these three would be the holy trinity of staple Christmas desserts.
These desserts suit the Aussie Christmas feast far more than hot and heavy plum pudding. Not that there is anything wrong with a boozy plum pud. They can be a little bit much, after a large Christmas feast, when the weather is 35°C (95°F) outside and counting.
I thought morphing two of Australia's most loved desserts together would be a natural winning combination. What I hadn't considered was how good it was going to be. Cheeselova is now at the top of my "favourites" dessert list. I knew it was going to rank high, but I didn't expect it to go soaring up the charts to debut at number one.
Nearly every Australian family serves a cheesecake or a pavlova as part of Christmas festivities. You now not only bring joy to your loved ones by serving both desserts in one, but you have a "sweet" conversation starter as well. They are going to think you are one clever cookie serving this baby.
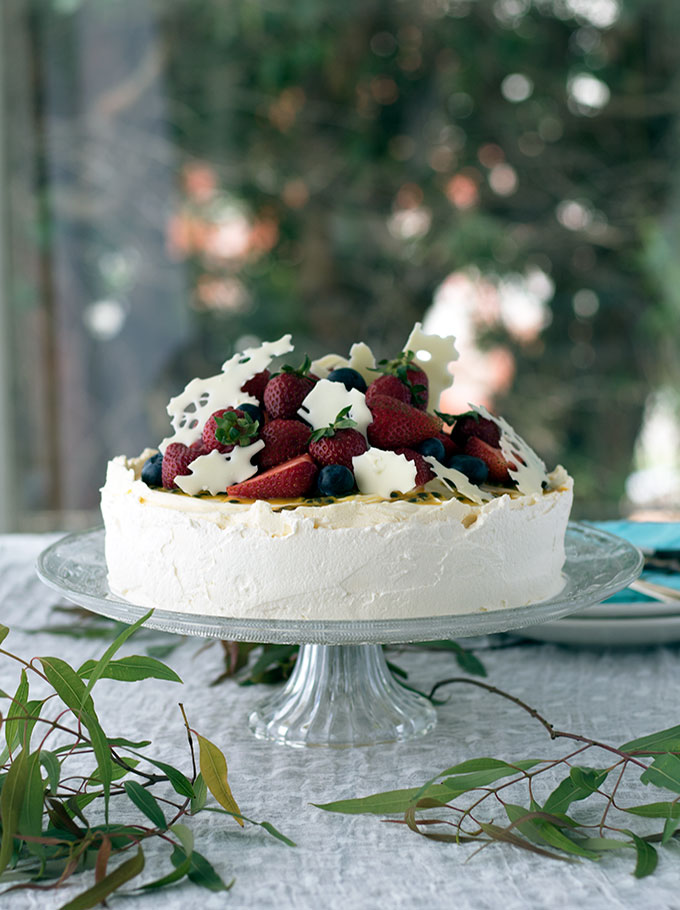
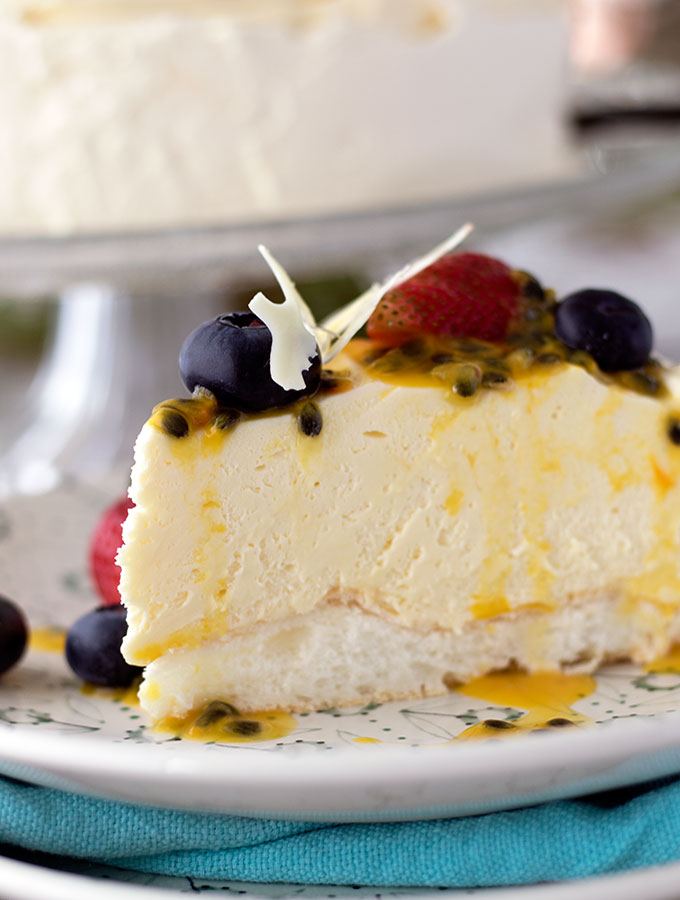
The Cheeselova has a crunchy pillowy pavlova meringue base instead of the traditional cheesecake biscuit base. Then the base is topped with white chocolate cheesecake. By decorating with classic pavlova flavours, such as passionfruit and fresh berries, the taste of these two classic Australian favourites is successfully melded.
The white chocolate cheesecake has a mild cream cheese flavour. The white chocolate and whipped cream not only lightens the taste, but texture as well. The cheesecake portion of the Cheeselova resembles a light as air mousse. The dessert as a whole is very light. The fresh berries lift it even more, and the passionfruit adds a lovely tang.

As you can see it isn't that difficult to make, you just need time on your hands. I made Cheeselova the day before serving, but decorated on the day my guests were to eat it.
Decorating is simple, pile it high with berries, and add a few shards of white chocolate. That is all the decoration it needs.
You could leave your Cheeselova naked on the sides, but by smearing the sides with cream you can hide any little unfortunate mishaps. For example a little bit of meringue sticking to your baking paper and leaving a hole in the side of your dessert. A bit of cream patching and nobody will know the difference. How do you think I came up with the cream smearing idea?
I do hope you enjoy my Cheeselova as much as I do.
Sara xxx
Other Cheesecake Recipes
Baked Matcha White Chocolate Cheesecake - green tea cheesecake topped with decadent dark chocolate ganache
Basque Burnt Cheesecake - four ingredient cheesecake sensation
Baked White Chocolate and Mango Cheesecake - creamy cheesecake topped with summery mangoes
Chocolate Cheesecake Crackle Pie - chocolate crackle shell with chocolate cheesecake filling
Strawberry Cheesecake Sponge Cake - when light and airy sponge and strawberry cheesecake collide
Lemon Myrtle Cheesecake - A creamy taste of Australia with a macadamia base
Baked Anzac Cheesecake - All the flavours of an Aussie ANZAC biscuit in cheesecake form
Printable Recipe
Cheeselova, Cheesecake and Pavlova Love Child
Ingredients
- 4 large eggs whites
- 115 grams caster sugar
- 115 grams icing sugar
- 250 grams white chocolate
- 500 grams cream cheese
- 150 grams caster sugar
- 2 teaspoons gelatine dissolved in (63ml) ¼ cup boiling water
- 300 ml cream whipped until stiff
- 4-6 passionfruit fresh
- 1-2 punnets strawberries
- 1 punnet blueberries
- extra white chocolate to decorate
- extra passionfruit and whipped cream to serve
Instructions
- Preheat oven 110°C (230°F).
- Remove the base from a 24cm (9 inch) springform pan. Put the base away as you won't need it for this recipe.
- Line a biscuit tray with baking paper. Place the (baseless) spring form pan on top of the tray. Line the springform pan with a circle of baking paper.
- Place egg whites in a large clean bowl (either for your stand mixer or to use with electric beaters). Using whisk attachment, whisk on high speed until the egg whites form stiff peaks. In other words the egg white stands up straight when the whisk is lifted from the bowl.
- Add caster sugar to your egg whites, a tablespoon at a time, whisking well between each addition. Continue until all the caster sugar has been added. The meringue will be thick and glossy when ready.
- Remove bowl from stand mixer (or place beaters to the side).
- Sift half the icing sugar over the top of the mixture. With a spatula gently fold through. Repeat with the remaining icing sugar.
- Spoon meringue into your prepared spring form pan that is resting on the lined baking tray. Smooth the mixture down so it creates and even top to the meringue.
- Bake in the oven for 1 hour and 45 minutes. The meringue will be a pale coffee colour. Turn the oven off, and leave meringue to cool in the oven, with the door open, for an hour. Then remove to a cooling rack to continue cooling. Do not remove the meringue from the tray or springform pan.
- Once the meringue has completely cooled, you can continue to the next step. The meringue will take a couple of hours to cool completely.
- Melt white chocolate via your preferred method. I melt mine in the microwave. Place melted chocolate to the side to cool while you continue on with the next step.
- In ¼ cup of boiling water add 2 teaspoons of gelatine powder. Mix well and dissolve the gelatine completely, set aside.
- Place cream cheese and caster sugar in a large bowl (either for your stand mixer or to use with electric beaters). Using the whisk attachment, whisk on medium speed until the mixture is smooth.
- Continue whisking and add the melted white chocolate. Then whisk through the gelatine mixture.
- Remove bowl from stand mixer (or place beaters to the side). Then fold through the whipped cream.
- Pour the cream cheese mixture over the top of your meringue base. Note that the base is still in the spring form tin and sitting on top of the lined baking tray.
- Smooth the cream cheese mixture with a spoon and place the Cheeselova in the fridge until set. This will take 3 - 4 hours. Or you can leave it overnight as I did.
- Once set you are ready to decorate.
- Without removing the Cheeselova from the spring form pan, gently remove the baking paper underneath. By keeping the Cheeselova in the tin it adds support to the dessert while you do this. Then gently place on your serving dish.
- Once securely on your serving dish, remove the spring form pan and surrounding baking paper.
- Smear extra whipped cream around the sides of the Cheeselova. Then top with passionfruit pulp, strawberries and blueberries.
- Note: You don't need to be restricted to berries. You can add any fruit you desire or even forgo fruit and top with shards of chocolate, caramel and toffee. Your choice of toppings is only restricted by your imagination. Go wild!
Oven Temperatures
All oven temperatures are fan forced.
Measurement Notes
All measurements are Australian metric standard. All measures are level, and cups are lightly packed unless specified. 1 teaspoon = 5ml / 1 tablespoon = 20mls / 1 cup = 250ml /4 teaspoons = 1 tablespoon.
NUTRITIONAL INFORMATION
The recipe's nutritional information is an approximation based on an online calculator. It is meant solely for reference purposes. If you're looking for precise details, be sure to double-check with your own research.
Julie
Just a quick but probably silly question. I'd like to make this for tomorrow but don't have any white chocolate. How important is it in the recipe?Thanks
Sara McCleary
Hi Julie
Sorry to only answer you now, I had finished up for the Christmas break when you left the comment.
The white chocolate is important in the recipe as it helps give the cheesecake its structure.
You could substitute it with another no-bake cheesecake recipe. https://bellyrumbles.com/no-bake-cherry-cheesecake/ or https://bellyrumbles.com/lemon-myrtle-cheesecake-recipe/
Cheers, Sara
Eleanor
Is it possible to use sour cream instead of gelatin powder?
Sara McCleary
Hi Eleanor
No
Cheers, Sara
Carol
Sara do you think I could use Lindt Strawberries and cream chocolate in this and I'm a little scared by this step- gently remove the baking paper underneath is there a trick to it??
Many thnks
Melissa
I was just wanting to know if I was to make this amazing looking dessert on Xmas eve, would it be ok to eat on Boxing Day afternoon?? Thank you
Sara
Hi Melissa,
You could in theory, but I have never left it longer than overnight.
What most probably will happen is the pavlova part of the dessert will start to weep sugary liquid.
The dessert itself will be perfectly fine to eat, as in it won't have gone "off". My main concern is the pavlova portion.
The longer you leave it the longer the weight of the cheesecake topping has to compress the pavlova base.
Often when I have made this dessert there are leftovers. Obviously, I don't throw it out, it goes back in the fridge to be eaten the next day or the day after. It does start to weep and look not as great as the day it was made. But that is a cut cheeselova with the cream and all the fruit on it.
If you do decide to have a go. Keep it in the tin in the fridge until you are ready to serve it. Put the cream and fruit on just before serving. You can whip your cream the day before and place it in an airtight container. Have your fruit ready to go. It won't take that much time to assemble.
Would I give it a go? I probably would, but knowing that the meringue will not be as crisp, as high and solid for the base. I would also make up some extra whipped cream just in case I had issues releasing it from the tin and needed to hide a little more than normal, eg a crack etc.
Let me know how you go if you decide to go ahead.
Cheer Sara
Jackie
I am not a pavlova maker, was wondering if you can use a bought one? Thanks
Sara
It could prove difficult as you use the tin you make the pavlova in when topping it with the cheesecake. The tin is what keeps it all together when setting.
Sara @ Life's Little Sweets
Wow, wow, wow, what a cheesecake! Pinning to my Cake Ideas & Dreams board, this is beautiful and delicious looking, pinning!
Annie @ Annie's Noms
This is totally genius!! What a perfect marriage between soft, tangy cheesecake and pillowy meringue! Just beautiful!
nicole
yes!! yes to this! genius -- mixing pavlova with cheesecake! thanks for sharing 🙂 pinning for later!
Brandon @ Kitchen Konfidence
This. Looks. Incredible!!! I love a good pav, and the combination of pav and cheesecake sounds SO good. Especially with that passion fruit on top!
Rachel @ Simple Seasonal
What a gorgeous cake! I'm having total cheesecake envy right now!
Daniela Apostol
I absolutely love your photos, they are fabulous! Great recipe too!
Kathryn @ FoodieGirlChicago
What an awesome combo - can't wait to try this recipe!! Beautiful photos too!
Lokness @ The Missing Lokness
What a cool idea! I love pavlova and cheesecake, but never thought of putting them together. This cheeselova looks so gorgeous! Love their with the tart passion fruit and berries too. Really is perfect for Christmas or any occasion.
lisa
This is a visual stunner! Absolutely gorgeous! Why aren't you my next door neighbor?
Ilona @ Ilona's Passion
OMG! What a pretty cake. So adorable! Pinning. I love your little introduction about you and Heston. Very lovely blog:)
Julia (@Imagelicious)
Omg - I love the name. So much fun! And I am sure it tastes delicious. Pinned!
Tara | Deliciously Declassified
Yum! This is an awesome idea... looks delicious and refreshing 🙂
Tania | My Kitchen Stories
Such a great idea Sara. I am sure quite a few people cooked it for Christmas.
Cristie @ Little Big H
Two of my favourite things. I'm excited to try this!
Ange @ Little Kitchen Blue
OH my lordy lord. This is GENIUS, and your photos are stunning. How where what why I have I not been belly rumbled before. Following, subscribing (eeek stalking???) pinning etc etc.....
peter @feedyoursoultoo
What a gorgeous cake. Love the title.
Mira
What a genius idea! This dessert looks awesome ! Love the combination of cheesecake and Pavlova! Pinning!
Sara
Thanks so much Mira, it really did turn out to be a wonderful combination.
Marsha | Marsha's Baking Addiction
This white cheesecake looks stunning, and so scrumptious!
serisblog.com
WOW this looks amazing! I think I will make this recipe for christmas! Love it!!!
- Seri
Sara
Thanks so much for your lovely comment
Lorraine
The meringue raises to almost 3/4 height of the spring tin. Is this correct?
Sara
Hi Lorraine, not sure where you read that the meringue raises to 3/4 of the height of the tin. Meringue doesn't rise. When you spread the meringue out in the tin, it may come up to about half the height of the tin, but more like a third. Then of course this compresses once you place the cheesecake mixture on top of it and leave it to set and settle. You can see the finished ratios in the photos with the cut slices.
Lorraine
Sry! What i meant is the meringue I baked raised to more than 1/2 the height of the tin. (It is almost like a whole cake to me)
Is it somewhere gone wrong with my preparation? Or i did not press down well enough.
Sara
Hi Lorraine,
Not quite sure what has happened, it will be taller than what you see in the picture of the finished cheeselova. As when you add the cheesecake filling on top the meringue will compress due to the weight of the filling on top of it.
If you used a smaller diameter tin than 24cm, the meringue will be higher. If you leave the base of the tin in, it will also be higher. I use medium sized eggs, but every egg isn't created equal. If your eggs had generous sized egg whites, then this could also increase the volume of meringue mixture you end up with.
I am sure you smoothed the meringue down so it was flat on top before baking, and no air bubbles etc.
Without being in the kitchen with you, it is very hard to know why your meringue has taken up the whole tin.
My suggestion is to carefully loosen the spring form tin from around your cooked base. Get a large sheet of baking paper (non stick), fold this over three or four times so it is thick and stiff. Place this around your cooked meringue, and then carefully close the springform around the new sheet of baking paper.
Make sure that the baking paper is a couple of inches taller than the tin. This will support your filling if it starts to come above the height of the tin when you pour it on top. Which it sounds like it will do. But it is important that you have enough thickness to the paper to support the weight of the filling being poured in.
Cheers
Sara
Lorraine
Thank you ????
The Hungry Mum
ps - Yummed 🙂
The Hungry Mum
I heart Shaggy but I reckon I would heart your lovechild Christmas dessert bonanza even more. What a glorious creation.
Sara
Awe thank you, it went down a treat here. Thanks for the yum too 🙂
JJ - 84thand3rd
LOVE IT!! Also, dancing visions aren't likely to leave me any time soon... please send therapy-cake 😉
Sara
Ha Ha JJ, sorry to scar you with that imagery!
Gaby
Love the idea of combining those two and, of course, the merged name 🙂
Sara
Wasn't sure about the name at first, but it is growing on me 🙂
john | heneedsfood
Bloody marvellous, Sara!, what more can I say? I'd sink my teeth into this any time of the day.
Sara
Thanks John, this dessert was eaten pretty quickly without really any leftovers.
Phuoc'n Delicious
Looks absolutely fabulous Sara! So ingenious!
Sara
Thanks Phuoc, a great compliment coming from the baking queen!
Rita (mademoiselle délicieuse)
Too awesome! And yes, perfect light textures & flavours for an Aussie summer Christmas.
Sara
Thanks Rita, it is so light compared to a traditional cheesecake.
Rebecca (Little Munch)
This is genius!! I am so doing this for Xmas this year - thank you Sara.
Sara
Thanks Rebecca, do let me know how it goes!